Skip to content

New: design your insert yourself, in 2D and 3D, with live pricingDiscover the editor

5S · Workshop tool trolleys

5S foam inserts for workshop tool trolleys

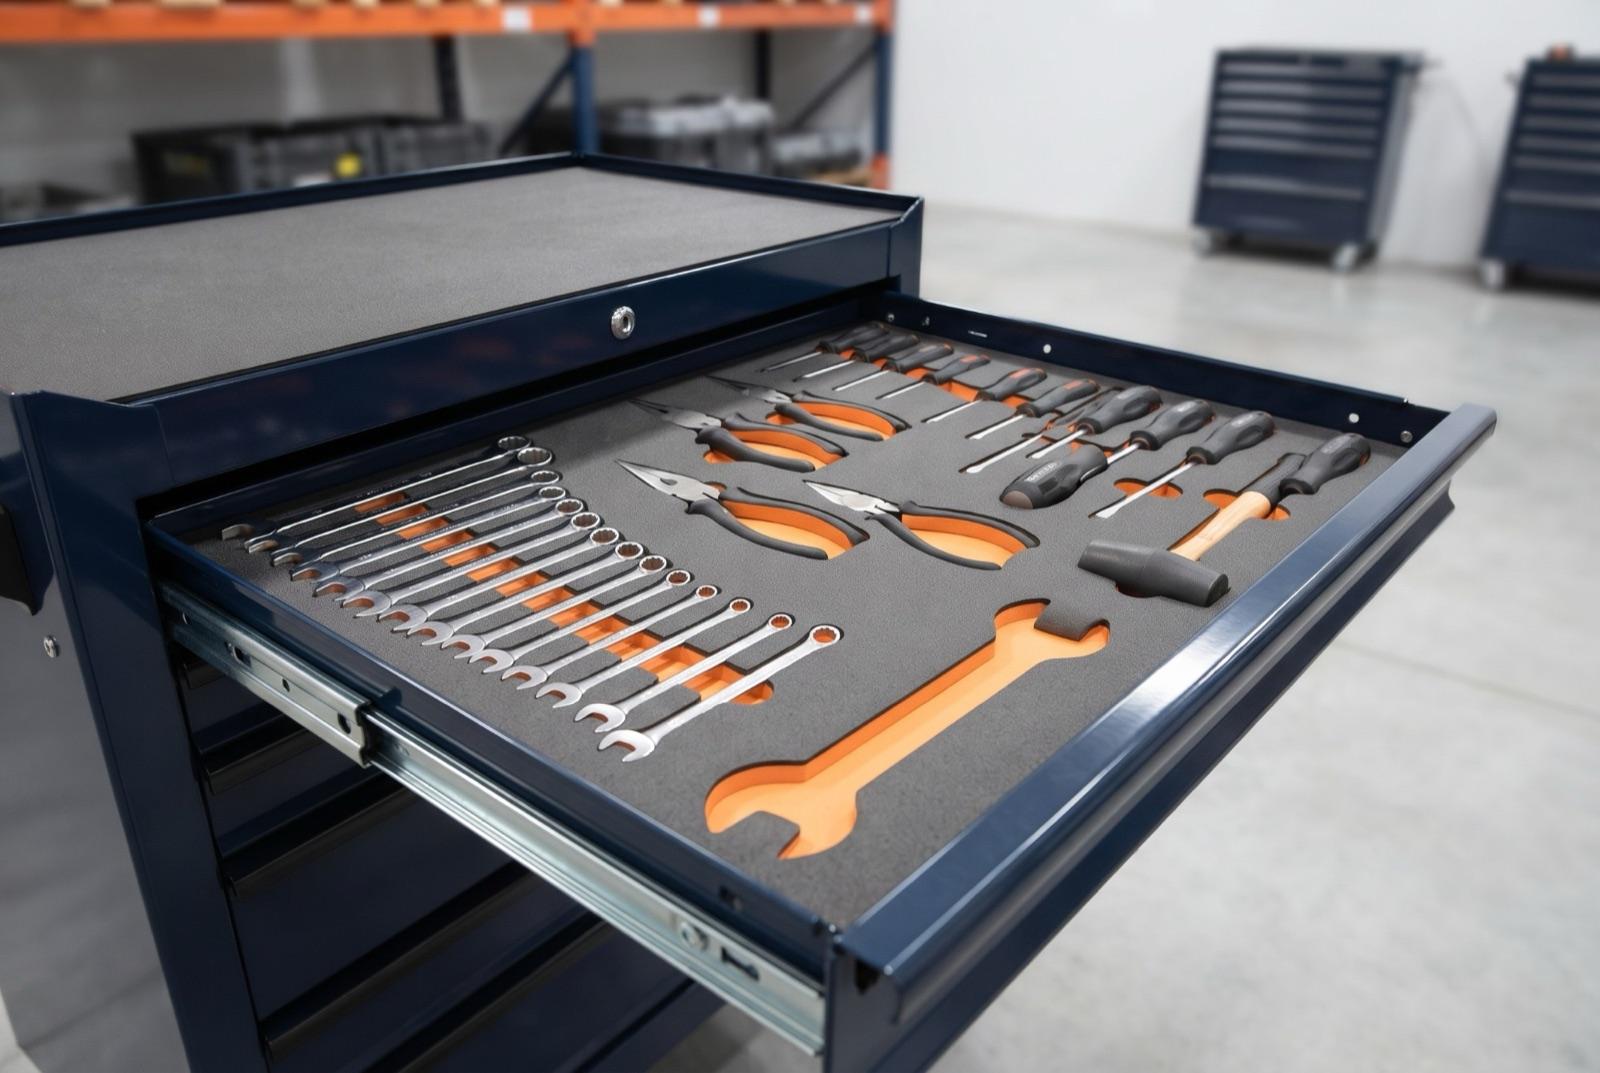
One insert per drawer, cut to the exact shape of every tool and identical on all your trolleys. With a two-colour base, a missing tool shows at a glance.

The 5S method

The five rules of 5S, and what an insert brings to each.

5S organises a workstation so that it stays clean, safe and efficient. A foam-lined drawer applies all five rules without any extra signage.

  1. 1S · Seiri

    Sort

    The insert only has pockets for the tools of the station: nothing useless finds a place.

  2. 2S · Seiton

    Set in order

    Every tool has a pocket of its exact shape, in the order you use them.

  3. 3S · Seiso

    Shine

    Cross-linked PE foam does not crumble and is easy to clean: the drawer stays tidy.

  4. 4S · Seiketsu

    Standardise

    The same insert is reproduced in every identical trolley, on every site.

  5. 5S · Shitsuke

    Sustain

    The colour at the bottom of an empty pocket flags the missing tool at the end-of-shift check.

Understanding 5S

5S, explained simply.

Where the method comes from, how to apply it to a workshop tool trolley, how to make it last, and what a foam insert changes at each step.

Chapter 1

Where 5S comes from

5S was born in Japan, in the factories that gave rise to Lean, with Toyota leading the way. It takes its name from five Japanese words that all start with S: seiri, seiton, seiso, seiketsu, shitsuke.

Its goal is not a workshop that looks “clean” for a visit. It is about organising a station so that any deviation shows immediately: a missing tool, a part that has no business being there, a leak. A 5S workstation can be read at a glance, by anyone, without explanation.
Chapter 2

The five steps

The five S are done in order: each one prepares the next.

  • Seiri, sort: Keep only what is really used at the station. The rest goes to storage, or in the bin. A red tag on doubtful items helps decide.
  • Seiton, set in order: A place for everything and everything in its place, in the order it is used. The most used items are the easiest to reach.
  • Seiso, shine: Cleaning is inspecting: while cleaning, you find the worn tool, the missing screw, the beginning of a leak.
  • Seiketsu, standardise: Lock in the right layout: photo, drawing, visual markers. The same standard applies to all identical stations.
  • Shitsuke, sustain: Short, regular audits carried out with the teams, so the standard stays alive instead of slipping within a few weeks.

Chapter 3

Putting a tool trolley into 5S, step by step

On a workshop tool trolley, the approach takes a few hours per drawer model.

  • Empty a drawer and list everything in it, with the operators who use it.
  • Sort: keep the tools really used at this station, remove duplicates and broken tools.
  • Rank by frequency: everyday tools at the front, heavy tools in the bottom drawers.
  • Lay the tools out in order of use, leaving room for fingers.
  • Lock the layout: it becomes the drawing of the insert, then the station standard.
  • Reproduce the same drawer in all identical trolleys, then audit.

Chapter 4

Measuring the results

5S is judged on facts, not impressions. Three simple indicators are enough to start: time spent looking for a tool, the number of tools lost or bought again over the year, and the score of a short 5S audit carried out every month.

In sectors where a forgotten tool is dangerous (aerospace, rail, machine maintenance), the end-of-shift check is also a safety matter: a tool left in a machine or an engine becomes foreign object debris.

Chapter 5

Mistakes that make 5S fail

  • The one-off big clean-up: A weekend of tidying with no standard and no audit: everything is back as it was the following month.
  • The imposed standard: A layout chosen without the operators does not match their movements, and it gets worked around.
  • Pick-and-pluck foam: Cubes pulled out by hand leave ragged edges, wear quickly and cannot be reproduced identically from one drawer to the next.
  • The forgotten audit: Without regular checks, deviations settle in without anyone noticing.

What you get

An insert designed for the workstation.

  • One insert per drawer, two-colour base by default
  • The name of each tool engraved next to its pocket
  • One drawer reproduced in all identical trolleys
  • Known brands: Facom, Stanley, Beta, Würth, Hoffmann, KS Tools, or your own dimensions
  • Dimensioned drawings and quote within 2 working days, production in 5 working days after proof approval
Open tool trolley drawer: spanners, pliers and screwdrivers stored in grey foam with an orange base, each tool in its pocket.
Illustration.

To get started

What we need.

The configurator asks for this information in order. You can save and come back later.

  1. 01The name of the station and the trolley (brand and model, or internal drawer dimensions)
  2. 02The number of drawers to fit out and the list of tools in each
  3. 033D files of the tools, or a photo on the A4 template
  4. 04The base colour and the text to engrave

What you gain

Estimate it with your own figures.

No gain is promised: replace the values with those of your workshop.

5S · Searching for tools

Time spent searching

= 220 hours per year

Example values: replace them with your own. A two-colour insert also makes a missing tool visible at the end-of-shift check.

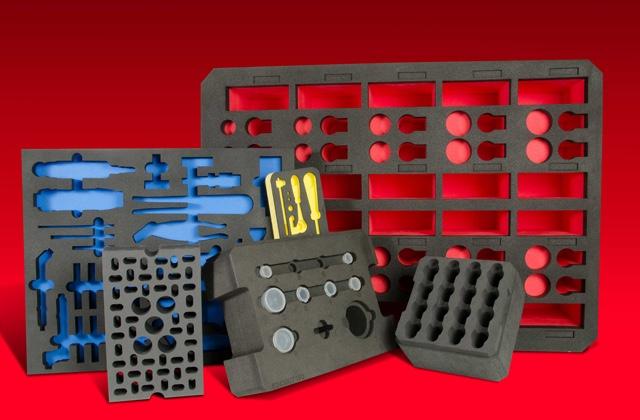
Several black foam inserts with a coloured base (red, blue, yellow), cut for tools, bottles and parts.
Black foam on a coloured base: red, blue, yellow or grey to match your codes.

Materials and options

Workshop foam, not packaging foam.

  • Black LD29 cross-linked PE

    Standard: rigid, does not crumble, easy to clean

    included

  • LD45 · EVA · ESD

    Heavy tools, premium finish, electronics (ESD on request)

    on quotation

  • Two-colour base

    Visual check of the missing tool

    +15 €

  • Engraving

    Tool name, SMED step number, reference

    +10 € / insert

  • Thicknesses

    5, 10, 30 and 50 mm sheets, combined to suit the height of the parts

    calculated

How it works

From your file to a fitted-out trolley, in five steps.

Nothing is made without your approval of the quote, then of the proof.

  1. Step 1 : Describe the project

    Stations, drawers or cases, then your parts: 3D file, photo on the A4 template or dimensions.

    online, no account

  2. Step 2 : Review and quote

    Every insert is checked. You receive dimensioned drawings and a quote in your customer area.

    2 working days

  3. Step 3 : Acceptance

    You accept the quote online: name, consent box, date and time.

    online

  4. Step 4 : Proof

    You approve the final drawing of each insert before machining.

    at your own pace

  5. Step 5 : Production and shipping

    Machining, inspection, tracked shipping.

    5 working days

Frequently asked questions

Your questions.

How does an insert help with 5S?

It makes the storage standard physical: one pocket per tool and the same standard on every station. With a two-colour base, the colour shows in an empty pocket and the missing tool is spotted immediately.

Which drawer depths?

Common depths are 30, 50, 70 mm. The foam thickness is worked out from the height of your tools, without exceeding the drawer depth.

Can you equip several stations identically?

Yes. Each insert has a quantity: the first one is at full price, identical ones at −35 %. From 10 inserts in a project, a further 10 % project discount applies.

How do I take the right photo?

Print the A4 template at 100%, lay your parts flat without covering the corner marks, then take the photo straight from above with all four corners visible. Give the height of the thickest parts.

Other solutions

The same workshop, other uses.

  • SMED · Changeovers

    SMED

    • Tools and parts in order of use
    • Step number engraved next to each pocket
    • Colour code per format or per machine
  • Cases · Metrology

    Cases

    • Known cases: Peli 1200 to 1610, Explorer Cases on request
    • Or the internal dimensions of your own case or box
    • Several layers for tall parts
  • Packaging · Machined parts

    Protective packaging

    • Pocket calculated from your STEP or STL
    • Standard dimensioned drawing of each insert before production
    • From prototype to series, drawings kept for repeat orders

Describe your first station. The rest follows.

Start without an account: your project is saved as a draft at every step.

  • Standard dimensioned drawings for every insert
  • Quote reviewed by hand, never sent automatically
  • Nothing is machined without your approved proof

Sign up for our newsletter

News, technical guides and workshop insights, at most once a month.